How to Manually Add an Email to a Segment in Klaviyo

.avif)
Klaviyo segments help ecommerce brands send personalized, targeted emails based on customer behavior and intent, keeping communication relevant and driving clicks and sales.
But the problem is, Klaviyo doesn’t let you manually add a contact to a segment. Unlike lists, segments are dynamic and rule-based. A profile only appears in a segment if it meets the exact conditions you’ve set.
But there’s a simple workaround for this:
- Create or locate the profile.
- Review the segment rules.
- Edit the profile so it qualifies.
- Add or update custom properties.
- Assign the profile to a list.
- Trigger events or actions that fulfill the segment rules.
Klaviyo refreshes segments in 1 to 2 minutes. If the profile matches, it’ll be included in the segment, and there’s no manual interference required.
In the next sections, we’ll break down the exact steps on how to add an email to a segment in Klaviyo, what to check if it doesn’t work, and how to avoid common errors that cause segments to miss contacts.
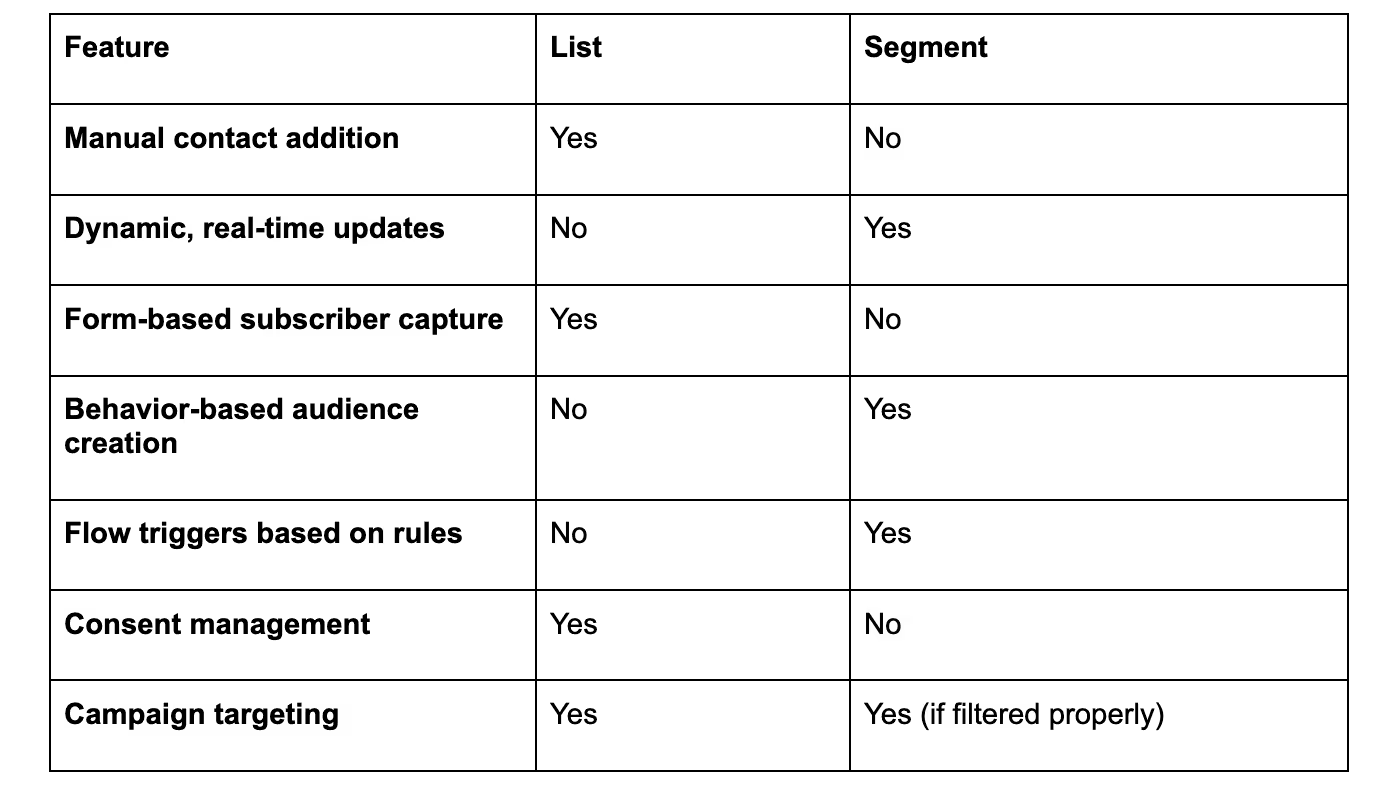
Lists vs. segments in Klaviyo
If you’re using a Klaviyo account for ecommerce email marketing, understanding the difference between lists and segments affects how you manage customer data, build campaigns, and trigger flows.
Here’s a clear breakdown of what separates the two, how both work, and how to use them the right way.
What is a Klaviyo list?
A list in Klaviyo contains contacts that are manually added, imported, or collected through signup forms. It’s static, so once someone is added to a list, they are included unless you remove them. Lists don’t change unless you update them yourself.
With Klaviyo lists, you can:
- Manually add contacts
- Import contacts via CSV
- Build a form that adds users to a specific list
- Use separate lists to manage opt-in status and email consent
Here are some of the most effective use cases for lists:
- Growing and managing your main subscriber base
- Sending general campaigns (e.g., newsletters)
- Setting up forms or lead capture flows
- Triggering the welcome flow series when someone joins the list
What is a Klaviyo segment?
A segment is dynamic. It’s a saved group of users who meet specific, real-time conditions. Once someone matches the rules you’ve defined, they’re automatically added. When they no longer qualify, they’re removed.
For example:
- Has placed an order in the last 30 days
- Has the tag “VIP”
- Clicked an email but didn’t purchase in the last 7 days
However, remember that you can’t manually add subscribers to a segment. If you want someone in a segment, they need to meet the segment’s conditions. That’s the only way they’ll appear.
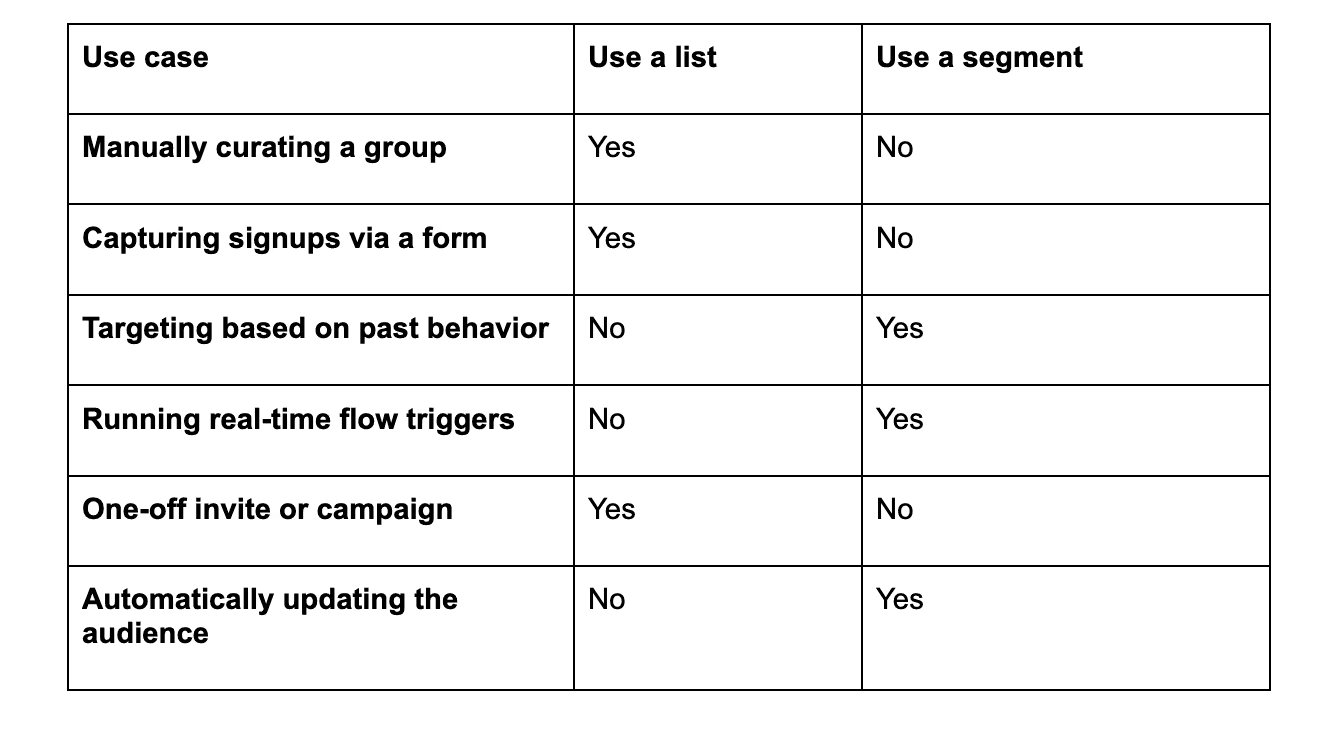
Lists vs. segments: What to use and when
If you’re sending emails to a segment expecting a contact to be there, but they don’t meet the rules, your campaign won’t hit. Similarly, if you’re trying to trigger a flow based on a list, but the condition is behavior-based, it won’t work.
Instead, you need to be clear about where each contact lives and how they’re grouped. In this blog, we’ll go deeper into:
- How to create and structure your lists and segments
- How to create segment-based automation
- What to check when profiles aren’t showing up where you expect
- How to manage hybrid setups (e.g., one main list + multiple behavior-based segments)
Step-by-step: Manually adding a contact to a segment
You can’t manually drop someone into a Klaviyo segment with a button click, but you can make their profile meet the conditions that trigger inclusion.
Here’s the 5-step workaround to get it done.
Step 1: Make sure the contact exists in Klaviyo
If the email doesn’t already exist as a profile, Klaviyo won’t process it in any segment logic. The fastest way to create the profile is:
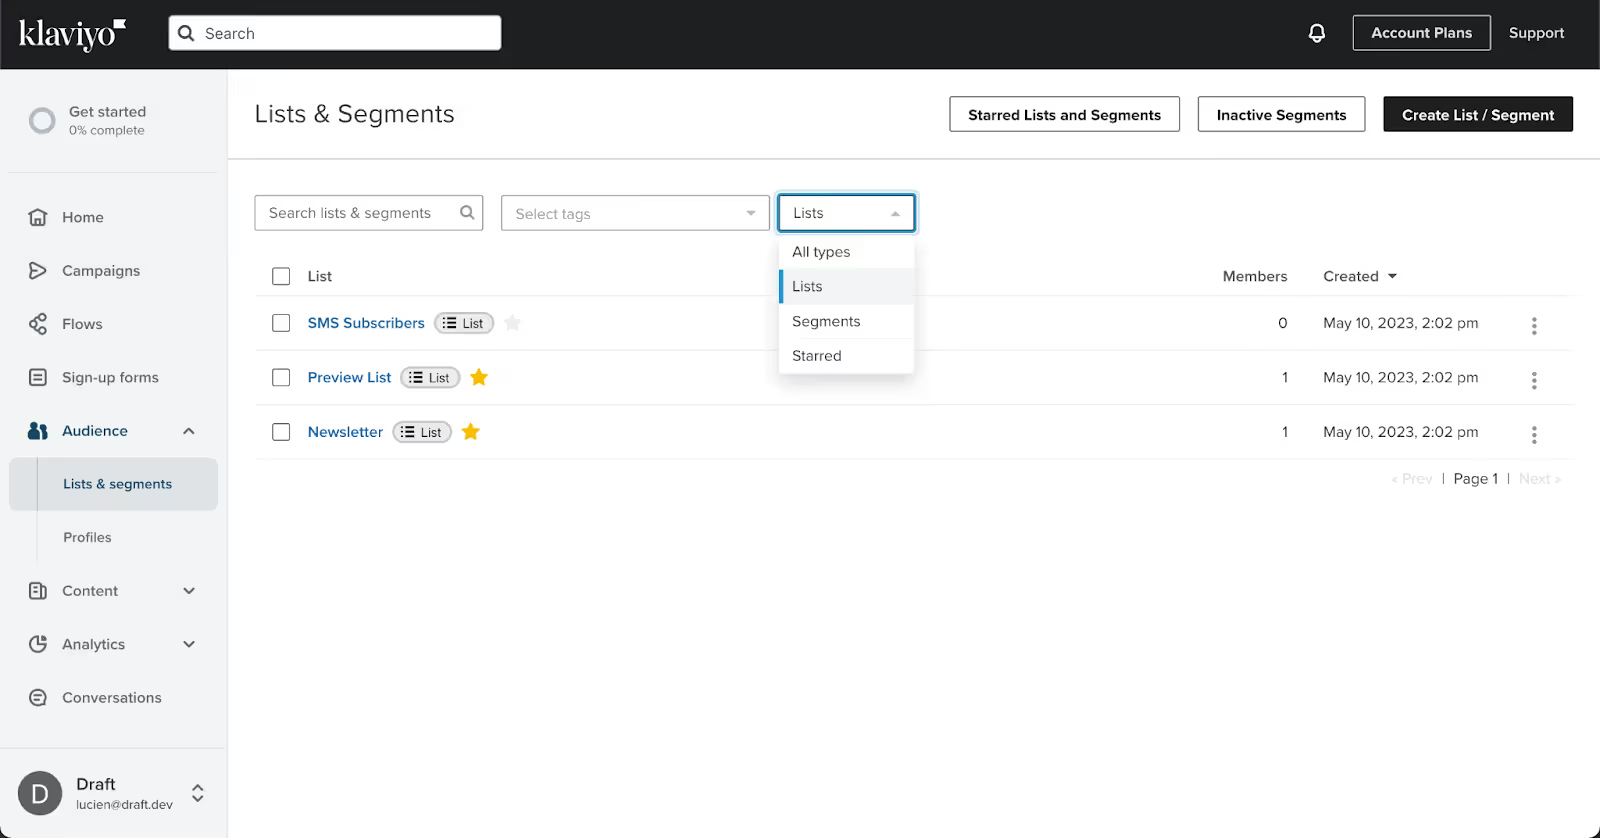
- Go to Lists & Segments.
- Select or create a list.
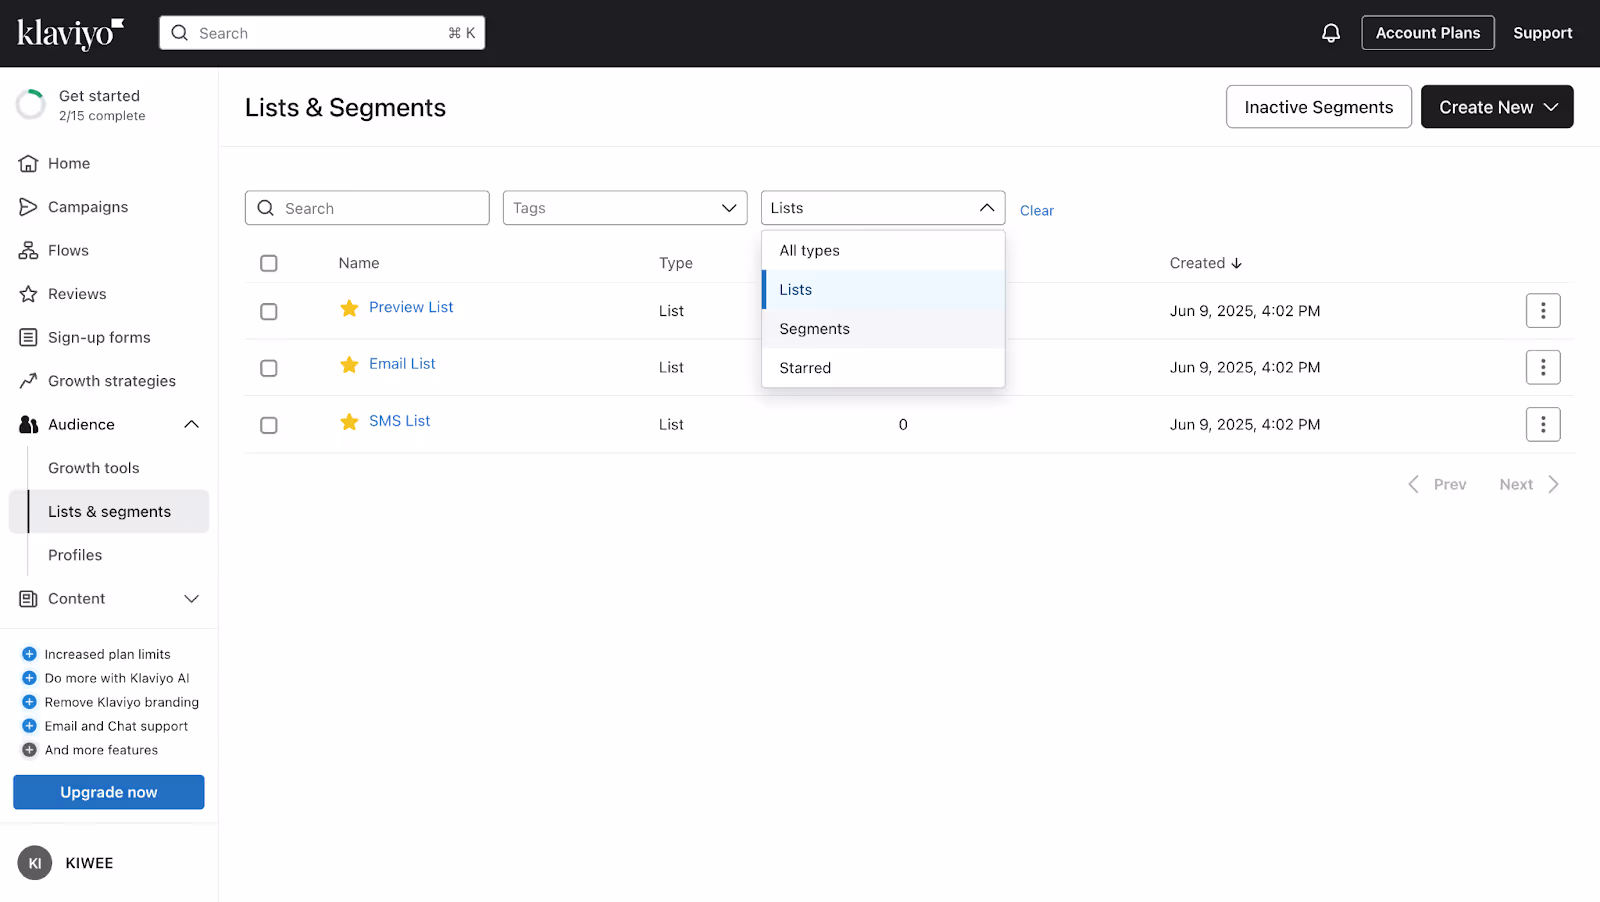
- Click Quick Add.
- Enter the email address (and any optional fields like name, phone number, etc).
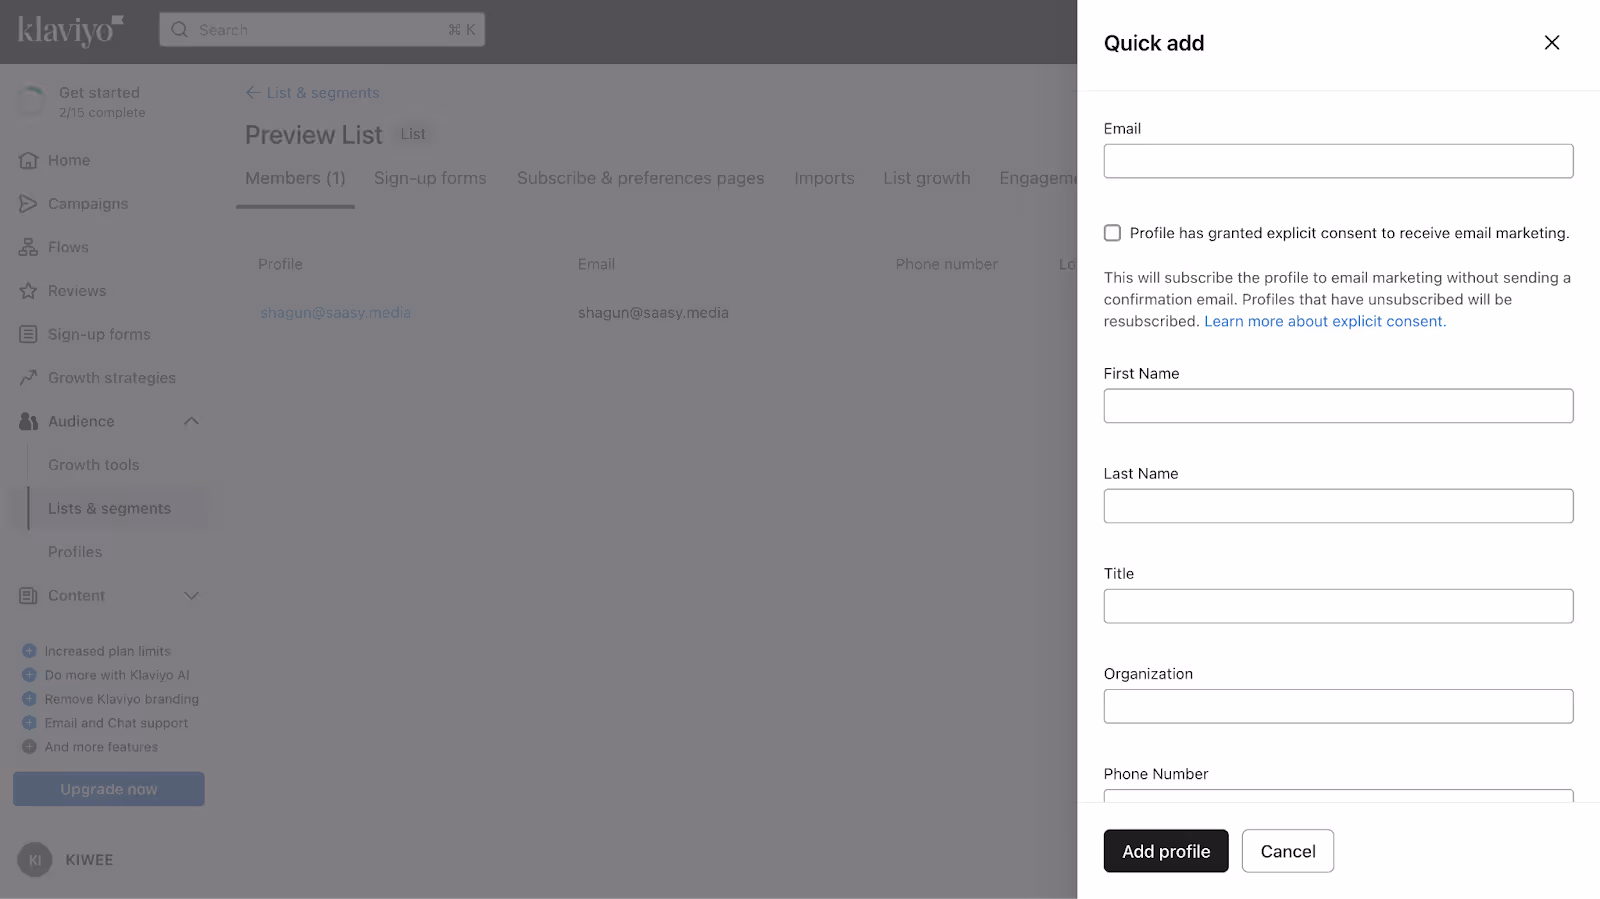
This creates the profile and adds it to the selected list, which can be used as part of your segment logic in the next steps.
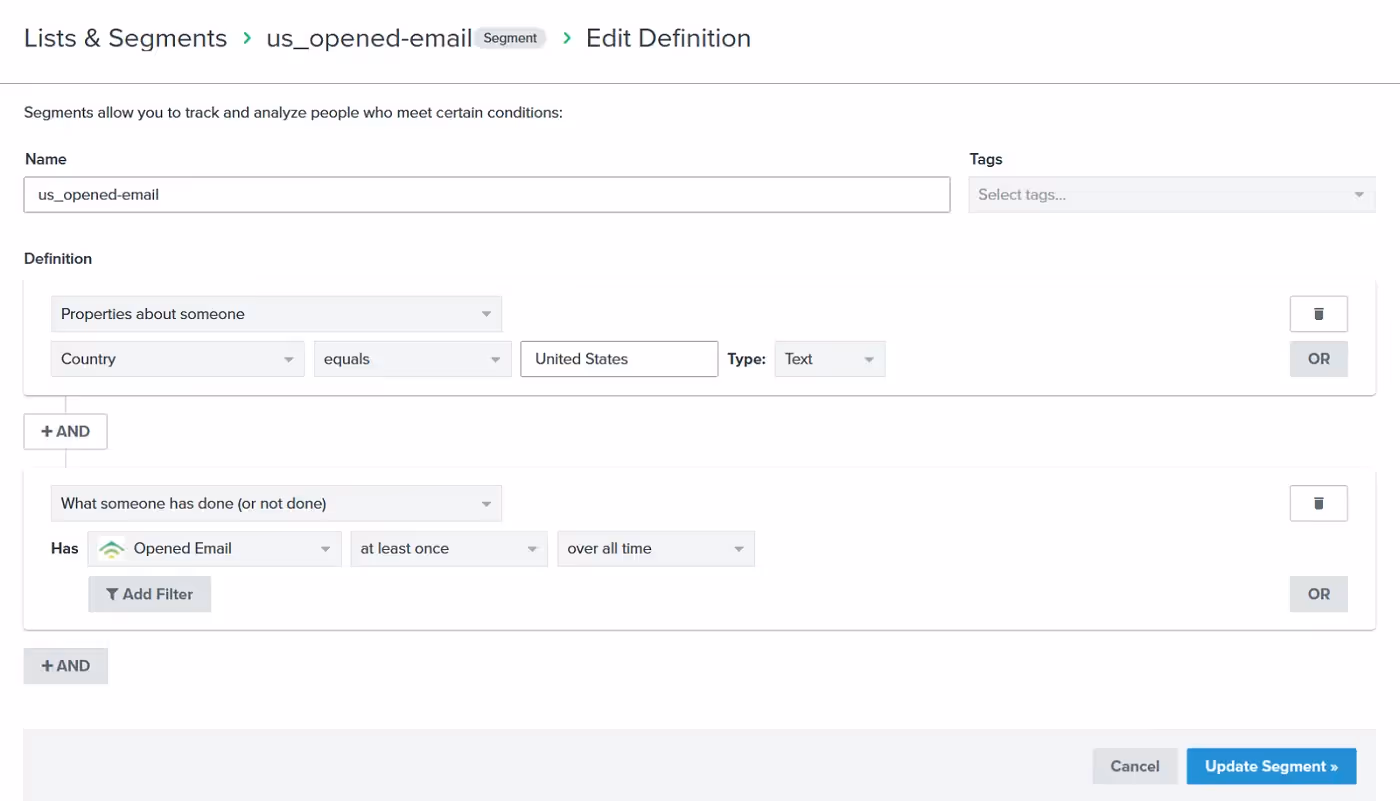
Step 2: Review the segment’s logic
Go to the Segments tab and open the segment you want the contact to appear in.
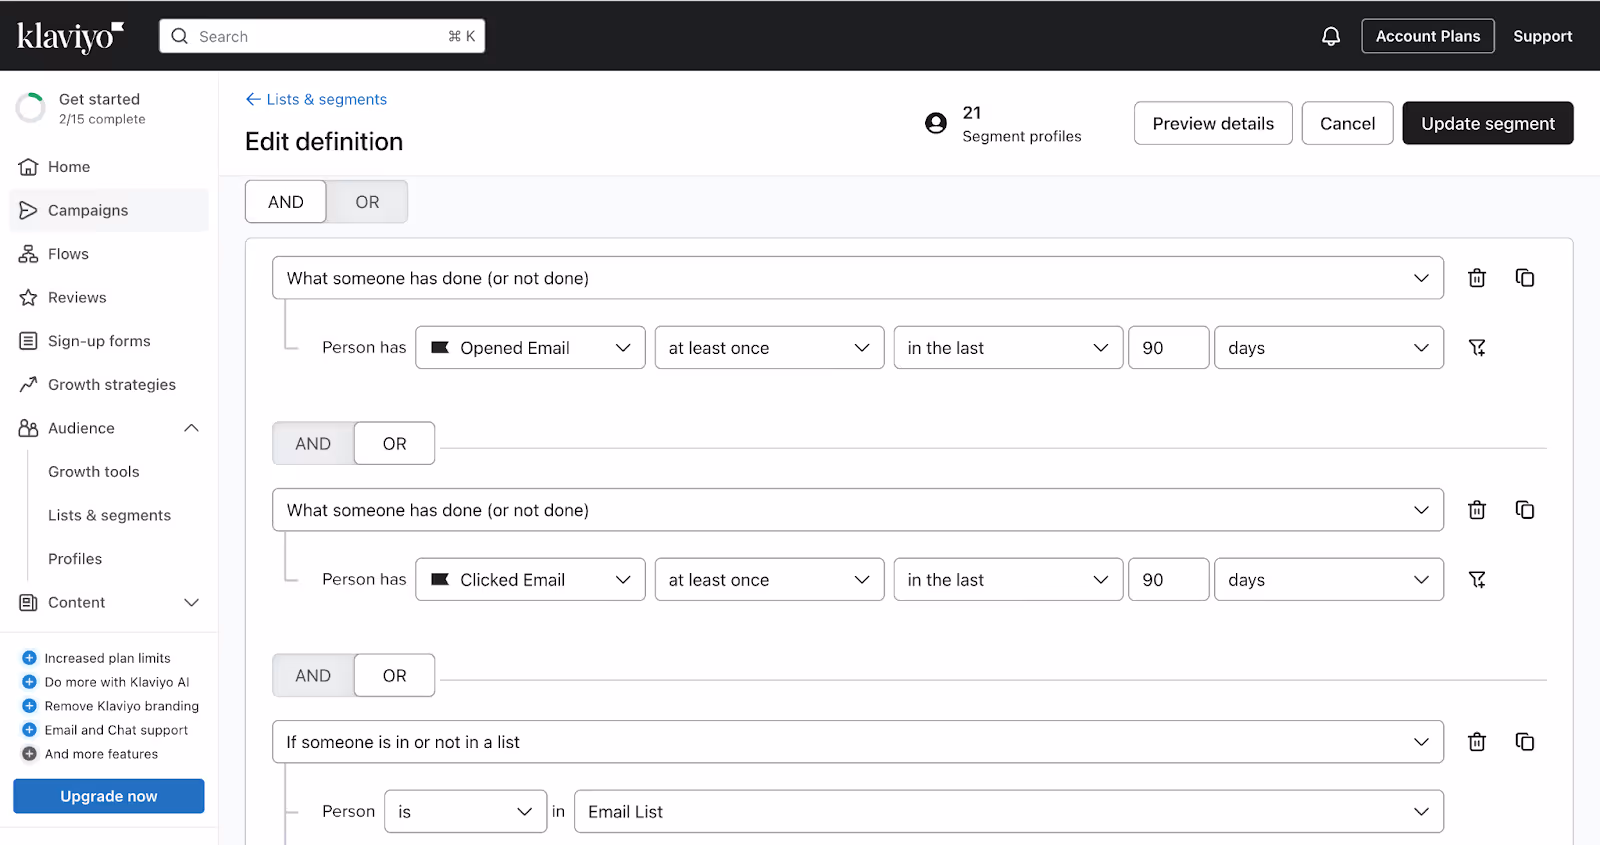
Check the rules:
- Are you filtering based on list membership (e.g, “Newsletter Subscribers”)?
- Or based on profile properties (e.g., “VIP = true”)?
- Or specific behaviors (e.g., “placed order at least once”, or opened email in the last 30 days)?
Note the exact logic because every detail matters here, including spelling, data types, and property names.
Step 3: Update the profile to match the segment rules
How you do this depends on the type of segment condition:
If the segment uses list membership
Make sure that the contact is added to that list (from Step 1). For example, if the segment says “In List: Product Waitlist,” the contact must be in that exact list.
If the segment uses a profile property
- Go to Profiles, open the contact, and click Edit Profile
- Under Custom Properties, add or edit the key-value pair. For example:
- Add VIP = true, or Loyalty_Tier = Gold
- Save the changes.
This is enough to trigger segment inclusion.
If the segment is based on behavior (e.g., actions or purchases)
These can't be manually triggered, but you have two workarounds:
- Modify the segment to also include another condition, like “is in list: Manual Add to Segment,” and then use that list to include the contact. (Temporary fix.)
- Use Klaviyo's Track API to programmatically log an event (e.g., Placed Order) to the profile.
Step 4: Wait for the segment to refresh
Segments in Klaviyo typically update in real time, but give it 1–2 minutes to process changes. There’s no manual refresh button. Just navigate away and come back, or use the search bar to check once ready.
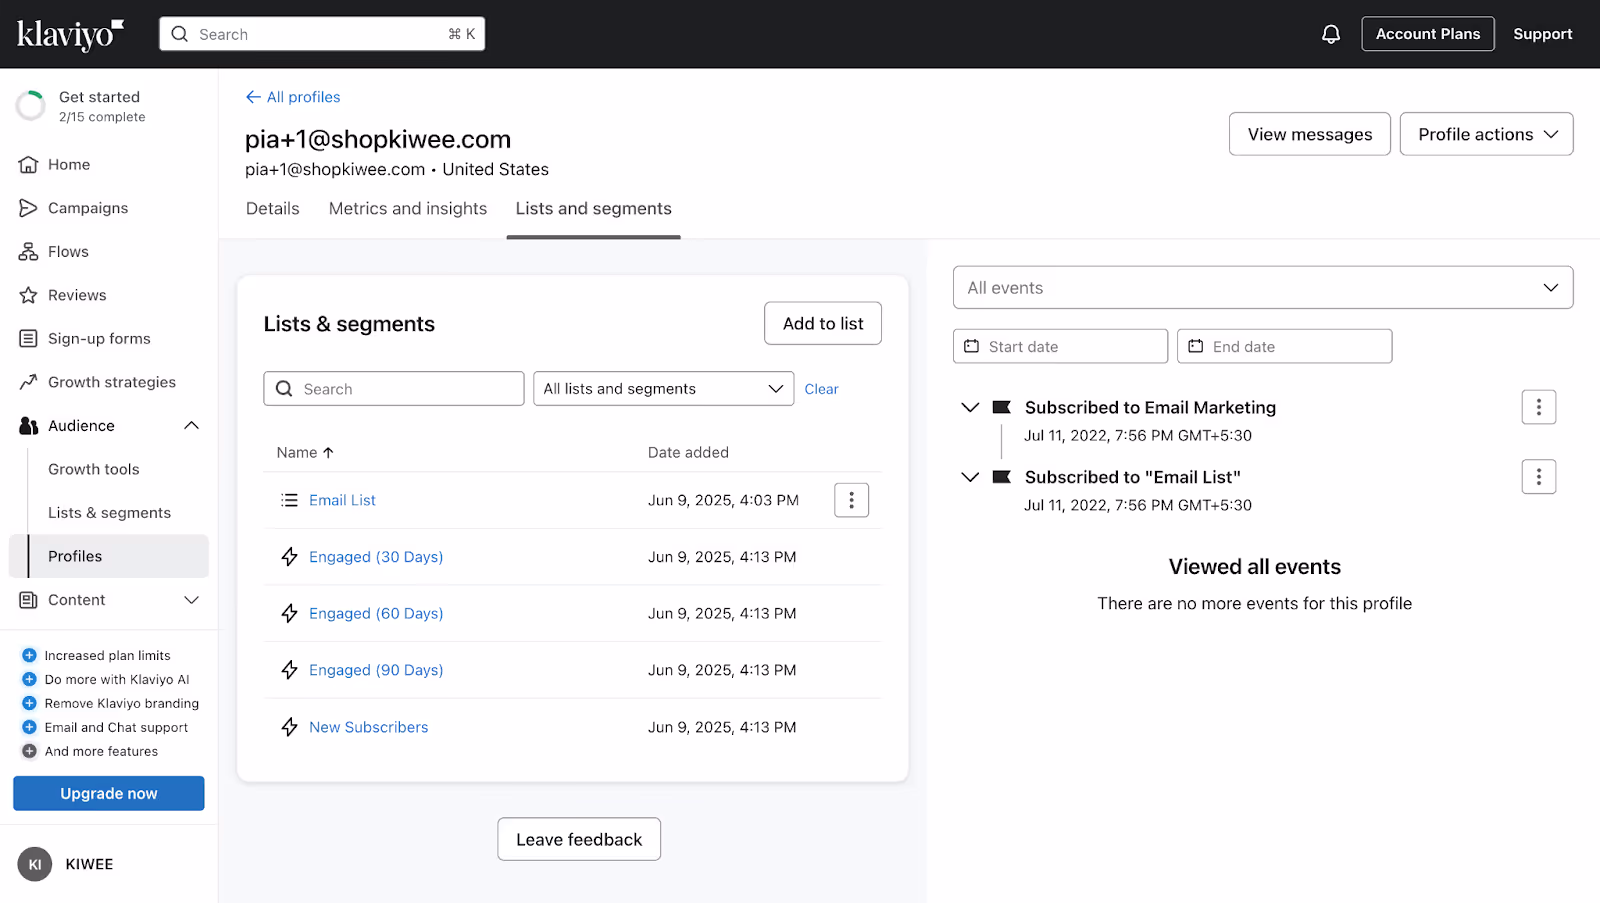
Step 5: Verify that the contact is in the segment
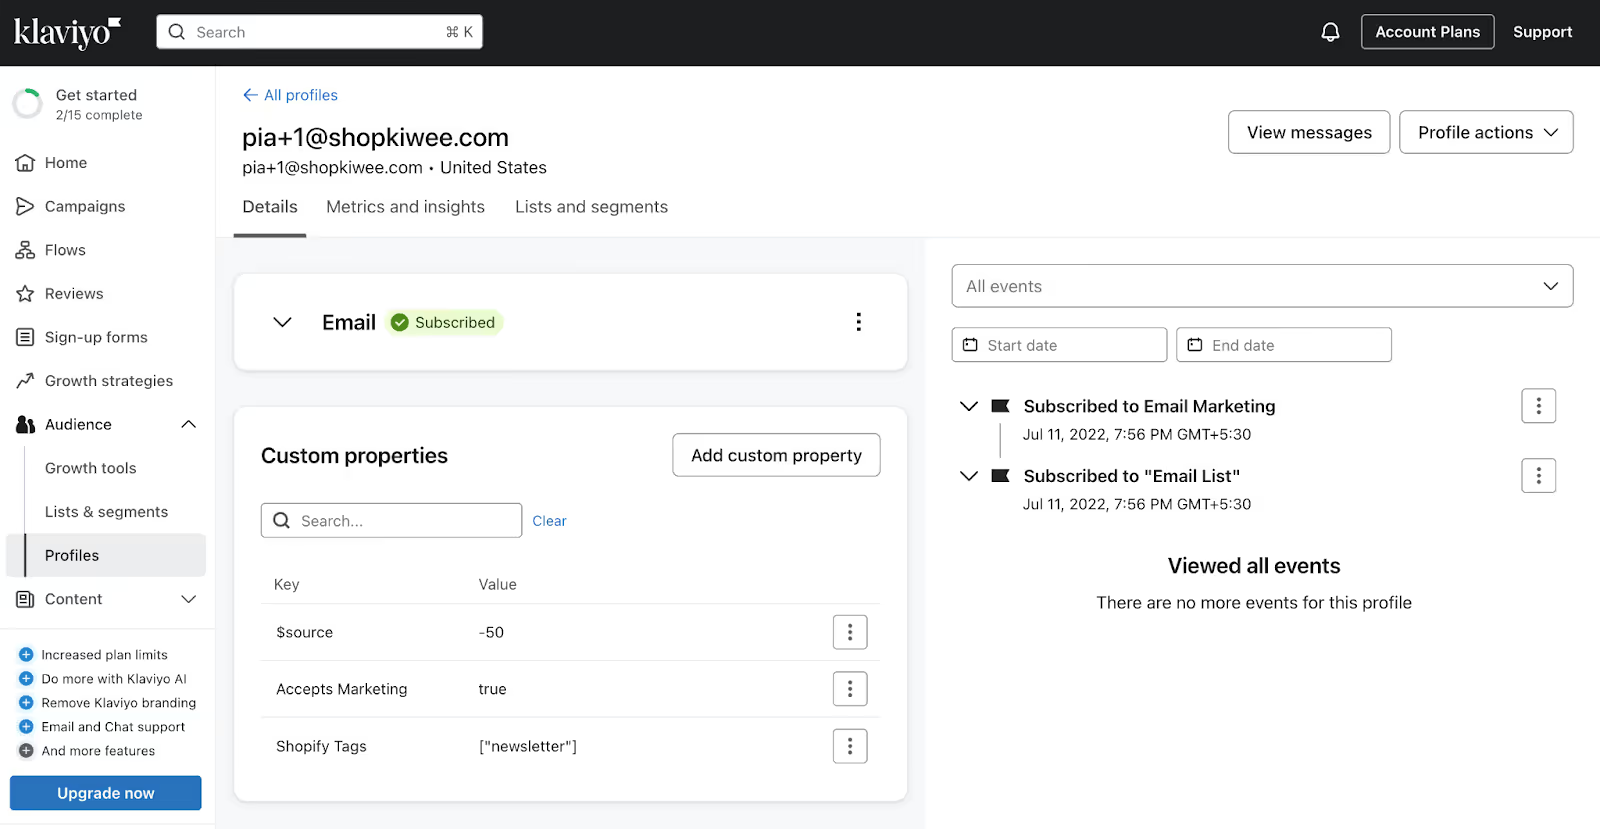
- Go to the Search bar at the top of your Klaviyo dashboard.
- Type the email address you’re looking for.
- Click on their profile.
- Scroll down to see the lists and segments they're in.
If the profile is not part of the segment, re-check every rule in the segment and compare it against the contact’s profile. One mismatch (even a lowercase tag name or missing list) can block inclusion.
Once you’ve done this a couple of times, it becomes a far cleaner fix than editing segment rules or duplicating flows just to include one contact.
Troubleshooting: Why the email might not show up
Since segments in Klaviyo require exact matches and real-time logic, one small issue can break the whole condition set. If you’ve added a contact and they’re not appearing in the segment, here’s what to check.
The contact doesn’t meet the segment conditions
This is the most common reason why the profile doesn’t show up in the segment. Here’s how you can solve it:
- Go back and review the segment logic.
- The profile must meet every condition, not just one.
- Check for exact spelling, property value formatting, and data type (e.g., “VIP” vs. “vip”).
- If the segment includes “is in List A,” make sure the contact is actually in that list.
Even small mismatches like using a custom property instead of a standard field will mean that the contact won’t appear in the segment.
You’re using a segment when you should be using a list
Segments are built for dynamic, rule-based logic. If you want to hand-pick contacts and group them manually, an email list is faster and more reliable.
Lists allow you to import, manually add, and build forms around them.
The contact is suppressed, bounced, or unsubscribed
Klaviyo will save the profile, but it won’t treat it as active if the contact has:
- Unsubscribed from marketing emails
- Hard bounced
- Marked your emails as spam or have been otherwise suppressed
You won’t see suppressed contacts in live segments, and you can’t manually add them until they opt back in.
To confirm if a profile is suppressed, check the profile status.
Timing delays
Segments usually update instantly, but in some cases, it can take a few minutes.
- Wait 5 to 10 minutes and refresh the segment.
- Make sure you're not relying on cached views. Segments inside Klaviyo aren’t browser-cached, but toggling away and returning can help refresh.
- Check the profile activity timeline to confirm the contact meets the rules (especially if the segment is triggered by events like “Placed Order” or “Started Checkout.”)
If your conditions are based on events, there’s often a delay between the event firing and the segment update.
Conflicting logic in your segment rules
Segments follow both inclusion and exclusion logic, making it easy to cancel yourself out accidentally.
Let’s say your segment says, “is in List A” AND is not in List B”. If you added the contact to both lists, it won’t appear in the segment. You would need to remove it from List B to make sure that it does.
How to fix this: Double-check all conditions, especially if your segment uses multiple AND/OR filters. Look out for logic that contradicts your recent actions.
Once done, here are the next steps:
- Review the profile’s full activity timeline
- Test the segment rules with another contact
- Duplicate the segment and simplify the conditions one by one to isolate the blocker.
Getting segment logic right is often about tightening small details. Once you’ve got it, the updates will be automatic.
Manual vs. automated segmentation
In Klaviyo, both lists and segments have their use cases. Knowing when to use each depends on how you manage contacts and how you want your audience to behave over time. Here’s how you can decide between the two:
Manual segmentation: Static lists
Lists are great for one-off use cases, but they don’t update automatically. If someone no longer qualifies for the list, you’ll need to remove them manually. This is doable at a small scale, but it isn’t viable to constantly add or remove contacts manually as your business or campaigns grow.
Instead, use lists when you want to:
- Manually add or upload contacts
- Build sign-up forms and collect consent
- Curate small, fixed groups (e.g., “VIP press contacts,” “beta testers,” “wholesale buyers”)
- Control exactly who’s in and who’s out.
Lists work well for curated invites, exclusive email blasts, and one-time launches to fixed audiences.
Automated segmentation: Dynamic segments
Segments update automatically based on behavior, events, or profile properties. You set the rules once, and Klaviyo keeps them fresh.
For example, if you set a rule like “clicked at least 3 emails in the last 90 days”, Klaviyo will handle adding and removing contacts in real time as they become eligible for the criteria.
You can use segments when you want to:
- Target by engagement, purchase history, or profile data
- Trigger email flows based on real-time behavior
- Clean your list automatically (e.g., suppress unengaged contacts)
- Avoid manually managing audiences over time
Difference between manual and automated segments
However, lists and segments are not “either/or”. They can work together. For example:
- Build a main list like “Newsletter Subscribers.”
- Then build a segment like “VIP Subscribers” that includes contacts from that list who have clicked 3+ emails in the last 90 days.
This lets you use consented contacts as well as behavior-based targeting, without manual work.
Klaviyo’s features that make segmentation easier
Most brands overcomplicate segmentation or manage it manually. But Klaviyo gives you a set of features that, if used right, can help you build dynamic, intent-based segments that don’t require constant supervision.
Here’s how to make segmentation work harder for you and avoid unnecessary manual cleanup.
1. Feed contacts into the right list from the start using Klaviyo forms
Most brands rely on one catch-all signup form. Instead, use dedicated forms tied to their separate lists. This gives you cleaner data and more control over how contacts are segmented later.
Here’s how to set it up:
- Build a form in Klaviyo (not a third-party pop-up tool)
- Under “Submit Action”, choose or create a list like “VIP Webinar Signup”
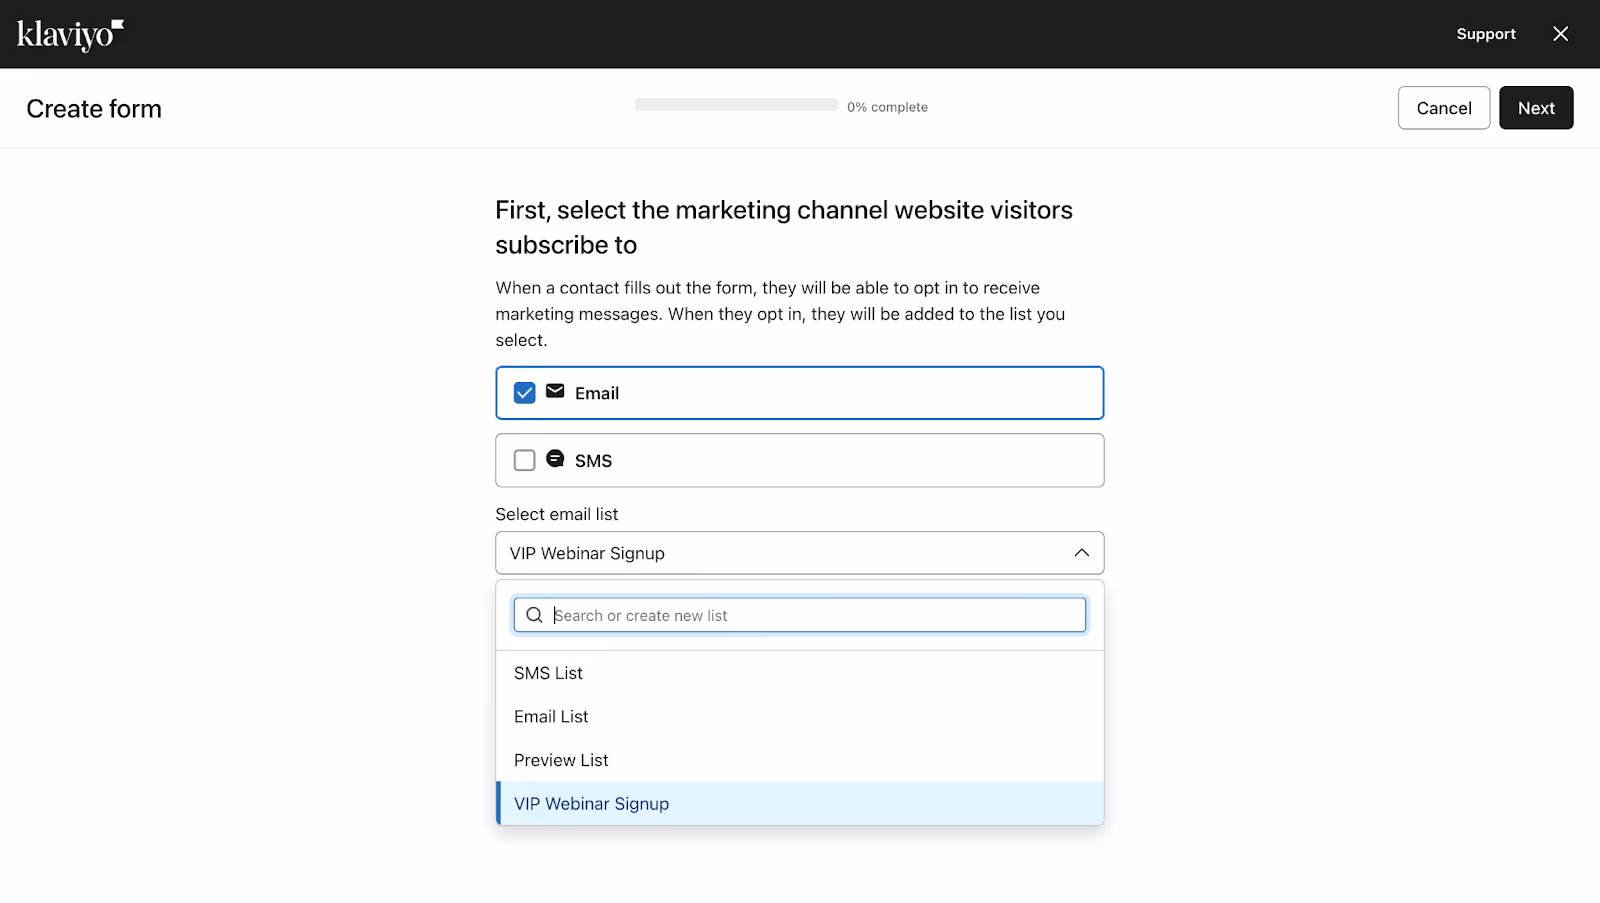
- All submissions go into this list— clean, source-tagged, and ready for segmenting.
Now, layer segmentation on top by creating a segment with conditions like:
- Is in list: VIP Webinar Signup
- Placed Order > $200
- Includes property: Loyalty Tier = Gold
This gives you a segment of qualified leads without manually filtering anyone.
2. Use profile properties to “flag” contacts for segmentation
Instead of tweaking segment logic every time you want to include or exclude a contact, assign custom properties directly to the profile.
How to apply it:
- Add properties like:
- VIP = true
- Press Access = yes
- Loyalty_Tier = Platinum
- In your segment, include logic like:
- Properties about someone > VIP = true
- Properties about someone > Loyalty_Tier = Platinum
You can manually apply these properties to any contact or set them via flows (covered below). This is the fastest way to keep segment logic simple but flexible.
For example, if you need to include a partner contact in your early access segment, just toggle ‘Early_Invite = true’ on their profile. There is no need to edit the entire segment.
3. Automate profile tagging through flows
You can trigger profile properties based on real behavior, so that segments don’t just rely on lists but also actual engagement.
Use case: Tag high-value buyers automatically
- Trigger: Placed Order
- Filter: Order Value > $300
- Action: update profile property → High_Spender = true
Now build a segment like:
- Has profile property: High_Spender = true
- Email open rate in the last 30 days > 20%
This approach helps you track real behavior across time, without manual effort after its set up.
4. Revisit segment logic every 90 days, minimum
Segments are only as strong as their logic. But, as profiles update, this logic can get outdated. What you defined as “engaged” or “VIP” six months ago may not reflect your customer base or marketing strategy anymore.
Here’s what to review quarterly:
- Which conditions are outdated?
- For instance, are you still using “Opened Email” 10+ times with iOS privacy changes making opens an unreliable metric?
- Are segments excluding more contacts than they should?
- Look for any accidental “AND + NOT rules that block inclusion
- Is segment logic mapped to real business goals?
- For instance, your "VIP" segment should reflect LTV or purchase behavior, not just open rates.
When you revise conditions, Klaviyo updates the segment instantly. You don’t need to remove or reassign contacts manually. The new logic handles it.
5. Avoid unnecessary complexity in segment conditions
Don’t try to make one segment do too much. When segment logic gets too layered, contacts may fall through due to conflicting conditions.
Example of broken logic:
- Is in list: Product Waitlist
- Placed Order in the last 30 days
- NOT in segment: Recent Purchasers
If you recently added someone to the Waitlist list, but they also fall under the “Recent Purchasers” exclusion, they’ll be left out, even if they meet every other condition.
Instead, here’s how to avoid this complexity:
- Keep logic specific and modular
- Use nested segments or combine multiple simpler segments for clarity
- Document what each segment is supposed to do, especially if it’s used as a flow trigger
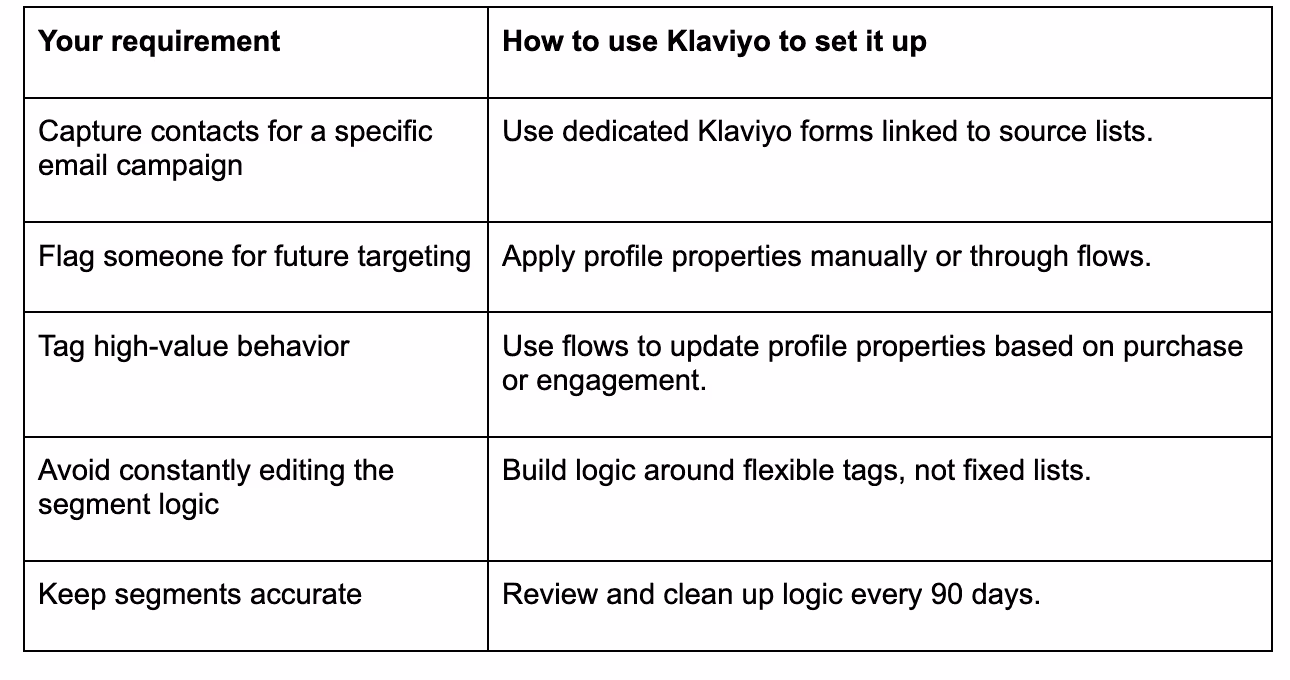
TL;DR: Best practices to segment smarter:
Tools to make customer segmentation easier
Manually managing segments works in the beginning, but once you start dealing with multiple sources, behavioral triggers, and high-volume customer data, it gets messy fast.
Here are tools that help automate segmentation and keep your lists organized without hours of manual effort.
Automate via integrations
If your contact data lives across multiple tools (a CRM, checkout app, support platform, etc), you can automate profile updates using:
- Zapier: Trigger updates to Klaviyo when a contact takes action elsewhere
- Klaviyo’s API: Automatically update profile properties or add users to lists when an external condition is met
For example, your CRM sends a webhook to Klaviyo when someone reaches VIP status. That contact gets tagged as “VIP = true” and your VIP segment picks them up instantly.
Use tools that grow & segment your list at the same time
Instead of collecting contacts and segmenting them later, use tools that feed segmented data directly into Klaviyo. For example, Tie is an identity resolution and data enrichment platform built for this:
- It identifies anonymous visitors on your site and enriches them with emails, attributes, and intent data
- It adds them directly to Klaviyo with the right profile tags and list membership, so your segments update automatically
- It helps you build high-quality, behavior-driven segments without asking users to fill out a form or double-opt in.
Want to grow your list automatically? Book a demo with Tie to see how it handles list growth, identity resolution, and real-time segmentation in Klaviyo.
Explore other advanced tools
Depending on your stack and team, here are other tools worth considering:
- Breeze Intelligence for HubSpot: Enrich B2B profiles with company and behavioral data
- Reveal: Helps you segment customers based on LTV and retention metrics
- Rockerbox: Attribution + segmentation for multi-channel ecommerce
- Segment (by Twilio): For complex data pipelines and audience creation at scale
- Shopify Flow: Tag customers based on order behavior, syncs with Klaviyo automatically
If you’re stuck managing inconsistent rules or your flows are underperforming, consider partnering with an expert who can help you set up effective segments and improve your email performance. Read our blog on Klaviyo experts to learn more about how to pick one and a few experts we’d recommend.
Klayviyo FAQs
Can I convert a Klaviyo segment to a list?
No, you can’t convert a Klaviyo segment into a list directly. However, you can export the segment and then re-import those contacts into a list:
- Go to the segment. Click on “Manage Segment”. Export Segment to CSV.
- Create a new list under “Lists & Segments.”
- Use the “Upload Contacts” option to import the CSV into that list.
Why can’t I see Quick-Add?
The “Quick Add” button only appears inside lists, not segments. If you’re viewing a segment, you won’t see an option to add individual contacts since segments are rule-based and update automatically.
To use “Quick Add”:
- Go to “Lists & Segments”.
- Click on a specific list.
- You’ll see “Quick Add” in the top-right corner of the list view.
Does Quick Add affect flow triggers?
Yes, “Quick Add” can affect flow triggers, depending on how your flows are set up. For example,
- If your flow is triggered by list subscription, manually adding a contact via “Quick Add” will trigger the flow.
- If your flow is triggered by segment membership, adding the contact won’t trigger anything until their profile meets the segment’s conditions.
Segment-triggered flows only run the first time someone qualifies, so test your logic carefully if you're using this as a manual inclusion method.